Project Log: Soundboard Faders Replacement
Over the last six months, I've gotten more involved with media team at church. Our goal is primarily to be invisible, to make the musicians and singers and pastor sound the best they can without anyone noticing we're there at all. We do this for everyone present in the sanctuary but also for our livestream to YouTube, which started during COVID when in-person gatherings were banned. Unfortunately, the setup we use has been cobbled together over many years and nobody really understands it. Since starting to help out, I've taken on the challenge of trying to understand how everything fits together and how we can make things better. It has been a project of learning things one week at a time.
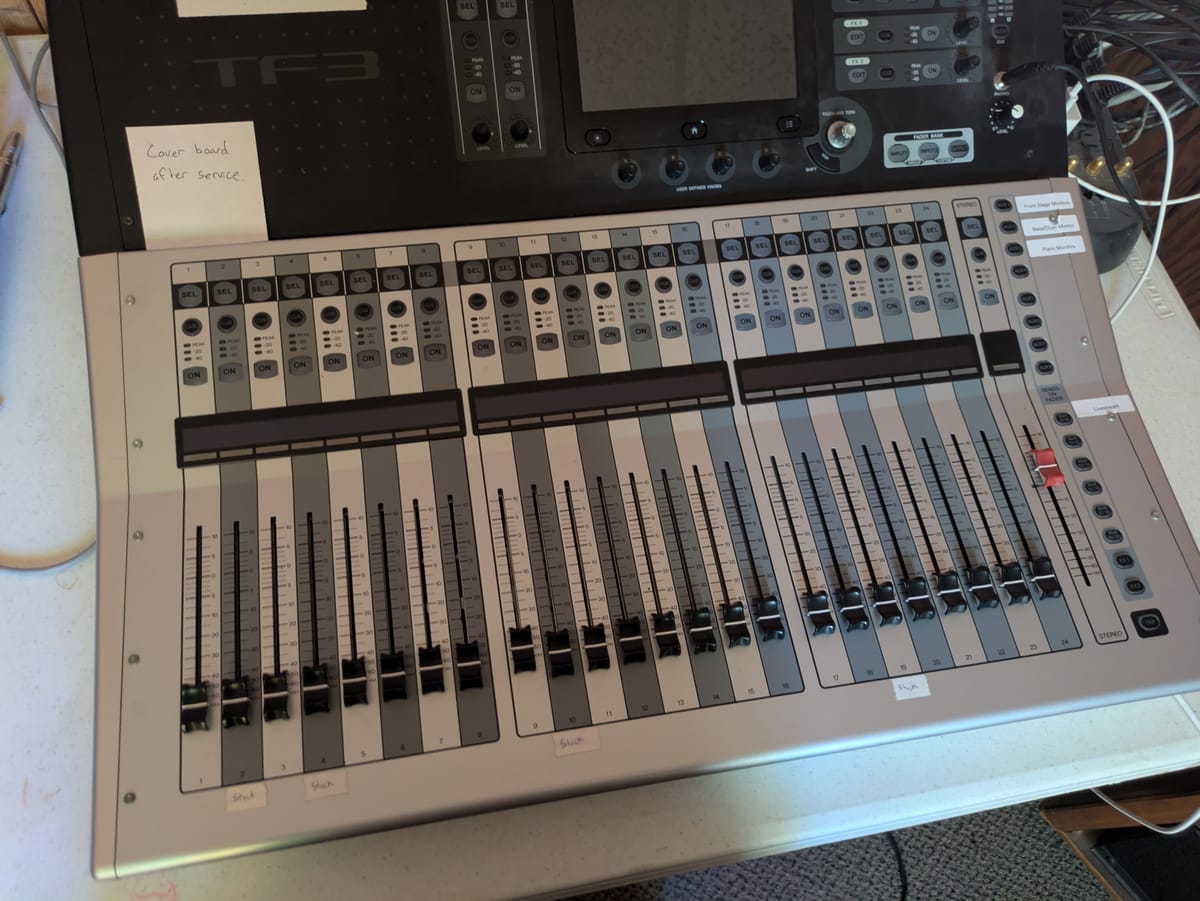
One problem that gradually stood out to me is that the Yamaha TF3 soundboard we use has a few stuck faders. The linear sliders that let you control the volume of a channel of sound are not just passive controls but are actually moved by the software that runs the board and indicate the current level of a given channel. To work properly, the board needs to be able to move the faders when you switch from looking at the output levels of the speakers in the room to the levels going to the livestream.
At some point, a few of those faders failed in a deceptive way: moving them by hand would adjust the level of that channel, but when something else like loading a preset changed the level, the fader would not move to show the new level. You could be looking at the board and see the fader was at a reasonable place, when in fact that was stale information and the channel was higher or lower than the board made it look. {We suspect this is this is a result of years of not putting the protective cover over the board when it isn't in use.} Eventually I was able to narrow it down that four of the twenty-five faders on the board had failed this way, and put a white spike tape label marking each one "stuck" until I had time to fix the problem properly.
This Sunday, the replacement parts had been delivered and I had the time, so I went over to the church between morning worship service and evening Bible study to take a swing at fixing it. I've taken apart my share of devices over the years, replacing worn out rechargeable batteries and re-soldering broken connections, but had never worked on something like this before. And yet I had blind confidence I could figure it out.
The first challenge I faced was lighting. The media loft has no lights of its own, because normally it gets plenty of reflected illumination when the whole sanctuary is lit up. But this was the middle of the afternoon, those lights were all off, and the natural light coming in through the stained glass windows was not enough to work by. As luck would have it, stored up in the loft were the filming lights that are used when making pre-recorded videos. I plugged one of those in and set it up with a good angle on what I was doing, and had plenty of light to get to work.
After that, I just had to figure out how to get the board apart. I could tell it came apart into an upper and lower half. The upper half is where all the screens and faders live and the lower half is where all of the XLR and TRS cables plug in. With more than 20 inputs and outputs wired in, I wanted to avoid having to unplug any of those cables, and save myself having to label each one and make sure it got reconnected to the right port.
Diving in based on experience, I started removing the screws that I thought would let me separate the top panel with the faders on it from the back panel. I turned out to be completely wrong. My mistake was not from lack of effort, but lack of documentation. Despite creating an account on Yamaha's website to order replacement parts, neither there nor on their main website could I find a service manual for how to disassemble the board.
I was puzzled how to proceed, so I rolled the dice on a sketchy third-party PDF download website that claimed to have the right service manual, and sure enough the document was legitimate and showed exactly what I was doing wrong. {The screws that I initially removed were all T10 Torx head screws. The ones I should be removing were Phillips head, which I presume is not a coincidence.} Undoing my initial attempt, I removed the plastic side plates and took out the proper screws, and the two halves pivoted apart:
This presented the next problem, which is how to to hold the two parts open to work on the board. The service manual depicts a very specific piece of bent sheet metal it calls a "panel stay":
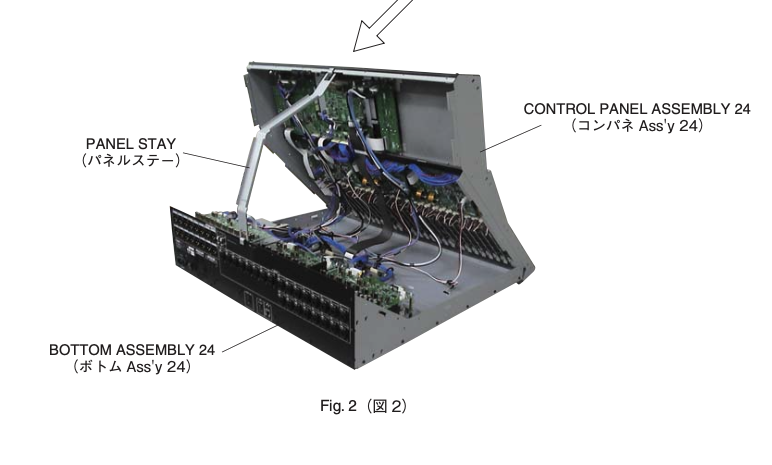
I didn't have that thing and I wasn't inclined to order one from their parts website for $140. So I had to get creative.
Each fader was held in with two screws and attached with two JST connectors, one two-pin for power and one three-pin for data. Working carefully and tediously I was able to hold the board open with one hand and undo the screws with my second hand and then hold the new part in place with my third first hand while I screwed it back in, taking breaks to rest my arms and reposition. Having a second person there as a human panel stay would have been convenient, but was not an option.
Once I had the first one replaced, I put things back together enough to power the board up and check everything worked by running a calibration on the replaced fader. It was a complete success and the new one zipped back and forth:
All told, it took me about an hour and a half to figure everything out to get the first fader replaced. I was able to do a second one in about 15 minutes after that. At that point, I had two more to do and twenty minutes until the rehearsal for our Christmas play was to start, so I put everything back together and left the last two for another day. I had fixed the two most troublesome faders: the drums and the choir leader's handheld mic. {Interestingly the failure does not seem to correlate with usage: the other two faders that failed are on infrequently used channels.}
Overall, I have to give the designers at Yamaha credit for making this sound board quite reasonably repairable, and for offering a reasonably easy way to get replacement parts. If they had used soldered connections instead of the JST plugs, it would be basically impossible to repair without fully disassembling the board. This is by far the most high-stakes and expensive piece of equipment I've ever repaired. If I did screw it up, we would likely find out in the middle of the worship service, so the pressure was on. But so far I'm willing to declare provisional success and look forward to round two which should hopefully go much more quickly now that I know what I'm doing.